Crochet Baby Mile a Minute Afghans to Make Free Patterns
I finished my first Mile-A-Infinitesimal infant blanket and I dear the concept. Not only is information technology a nifty fashion to use up yarn, it's a beautifully polished finished project. Because of the way its put together, you can combine yarns of different colours, brands and makes still nowadays a very unified project.
I posted an "I'm finished" picture on the Facebook group, Crochet Addict. Less than 24 hours later, it had g likes and repeated requests for the design, and so I decided to blog my version of the pattern here below, rather than try to reply to and so many people individually.
Apologies for the pictures. This is what you go when you have pictures on a cloudy/rainy late afternoon with your iphone.
The pattern is beneath. Curl downwards to find it! On your way, check out some of the crochet eye candy in the photos.


 |
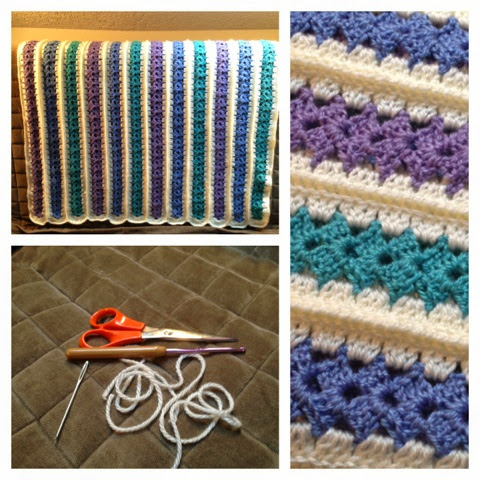
| This is how much white yarn I had left over. Zilch makes a yarncrafter happier than using leftovers all upwards! |
 |
| I of my favourite things about this pattern are the ridges created past joining the strips together. I placed my strips backsides-together and used single crochets in the back loops but to go this look. The ridges also continue the blanket overnice and square and arrive very easy to fold neatly. |
 |
| A few of the edges look curled upwards in this photo. This is a jerky and slightly deceptive shot. I really should try to take some meliorate pictures. One of the all-time things nearly this blanket was how evenly the ends turned out. Check out the symmetrical ends in some of the photos above. |
Pattern Instructions - My Version:
The inspiration for this pattern is bachelor through Ravelry. Search for "Mile A Infinitesimal Baby Afghan (archived)" if y'all would like to meet that version. The Ravelry version links to this pattern. My version is slightly different, so I'm writing it out below.
Materials:
This blanket was made with sport-weight (#3) yarn. I used leftovers from my yarn bin and so the amounts are a best approximate, only hither'south what I used:
- For the colourful strips: Bernat Satin Sport - 3 colours, less than one skein each (this yarn is discontinued; a good substitute would exist Caron Simply Soft Light; it'due south skeins are much bigger, so you lot would require significantly less)
- For the white edging: I used a combination of Bernat Satin Sport in "Aran" (discontinued) and Bernat Softee Baby in "Antique White." I used approximately 1.5 skeins of the Bernat Satin Sport and 1 full skein of Softee Baby, so 2 full skeins of Softee Baby should be enough to practise the play a trick on!
- Considering information technology was sport-weight yarn, I chose a G hook
- Keep your yarn needle and scissors handy; this blanket works out best when yous work in the ends as you go (i.e., every bit you end each strip)
Timeline:
I consider myself to be a medium-speed crocheter. At my humble pace, each strip took one hr to consummate, including working in the ends. Time to join the strips and add together the edge was a fleck extra.
To Crochet A Strip:
You lot'll use one of your colour choices make the inside of the strip first. Then you lot'll add a white edge around it.
Foundation: Ch 7. Bring together with sl in 1st ch to brand a loop. (Annotation: A magic ring will not work for this pattern. Stick with the ch 7 option!)
Row 1: Ch iii, two dc in foundation loop. Ch three. 3 dc in foundation loop.
Rows two-49*: Ch 3, plough. three dc in ch 3 space from previous row. Ch three. 3 more dc in space from previous row. one dc in peak of ch three chain from the row below.
* = brand the strip however long you lot'd like. I establish 50 worked well for sport-weight yarn and a baby blanket. Unlike coating and yarn sizes might work better with more than or less rows. Simply brand sure all your strips are the same.
Row 50: Ch iii, plow. 3 dc in ch iii space from previous row.Ch v.iii more dc in infinite from previous row. 1 dc in tiptop of ch 3 chain from the row below. Fasten off your yarn.
At present for the strip edge:
Note: There is non really a "right side" or "wrong side" to the colour strip, since you've been crocheting back and along, back and forth.
Bring together the border yarn with a slip stitch in any of the spaces forth the side of the strip created past either the ch 3 or the lone dc. Ch 3. 2 additional dc in this space. Work 3 dc in each of the spaces created past the ch three or lone dc'southward along the side of the strip.
When yous become to the loop at either terminate, work 12 tc into the loop, and so continue up the other side with 3 dc in each space. Join your last dc to the top of the starting ch3 and fasten off.
Now is the time to work in your ends. Trust me, it'south easier to do it now than when the blanket is all joined together!
Voila! One strip complete!
It'due south your choice as to whether you'd like to stockpile all of your strips and join them together at the end, or join them as you go. It makes no divergence either style.
Concord two finished strips with the backsides together. (Look at the white border to determine which is the front and which is the back.) At this point the strips as well take a peak and a bottom, thanks to the v-shape created by the colourful middle of each strip. Brand certain the Vs are pointing the aforementioned way before yous start joining!
(Here is where I may demand to add together pictures.)
Using your border color, and starting in the dorsum loops of the 10th tc on the biconvex ends of the strip, join the 2 strips together with a sl. Crocheting in the back loops only, piece of work your way down the strip, beginning with the 11th tc, so the twelfth tc, then each of the dcs, using sc to bring together the strips together. Fasten off once y'all reach the 3rd tc of the arch at the other end of the strip. Work in your ends.
Finishing:
To house up the edges of the coating, consummate a round of sc around the entire blanket. I used one sc in each dc around. In society to keep the biconvex/scalloped edges curvy, I stitched 2sc into most of the tc stitches on the ends of the coating. (I'll post a diagram later to testify what I hateful.)
If you have any questions virtually the instructions, delight leave a comment below and I'll practice my all-time to clear it up for you! Enjoy!
Source: http://whowantstobemarthawhenicanbeme.blogspot.com/2014/09/my-version-of-mile-minute-baby-afghan.html
0 Response to "Crochet Baby Mile a Minute Afghans to Make Free Patterns"
Postar um comentário